Running, Debugging, and Getting Help
Keywords, Handlers, Verbs, and Calls
Loops, Variables, Parameters, and Conditionals
Returns, Addresses, and Dereferencing
Running, Debugging, and Getting Help
String Parsing and Substitution
Manipulating Files and Folders
Where to learn more
We are almost ready to put our knowledge to work for us, developing a serious and useful Frontier script. But before we do this, we should know how to enlarge our knowledge independently of this tutorial.Clearly a tutorial like this can't come close to covering every Frontier verb; so how will you know, as you develop your own programs, what verbs exist and what can be done with them?
Also, in this chapter we will say something about working with scripts in general, since they have a number of features we have not yet studied explicitly.
DocServer
The primary reference source for information about built-in Frontier keywords and verbs is the DocServer website.Note: The DocServer website is currently being updated for Frontier 5. The pre-Frontier 5 version is at http://www.scripting.com/docServer/
The not-quite-ready-but-useful-anyway version of the Frontier 5 Verbs Docs website is here:
Frontier.root
Another important place to get information about Frontier verbs is from the database itself -- naturally enough, since a verb is a database entry.Again, there's a shortcut for finding out more about a database entry whose name you see in front of you: control-double-click (on Windows) or command-double-click (on Macs) the name of a database entry to jump to it.
Looking directly in the database becomes more important when you're dealing with suites, whose verbs are not usually documented in DocServer. Suites not infrequently contain readme files and a table of examples that instruct you in their use.
You can learn quite a bit, too, by browsing the database generally and just reading scripts, trying to understand them.
Comments
Part of what helps you in studying a script is its use of comments which explain what it is doing. Use of comments is an art, but it is widely agreed among scripters that it is important to provide comments, both for others and for yourself, later, when you are trying to reconstruct why you wrote a script the way you did.In Frontier, comments are of two types: either the whole line is a comment, or the line starts out as UserTalk code and then has a comment appended to it.
To append a comment to a single script line, type two slashes, like this: //.
To make a whole line a comment, select the line or any text within it and hit control- or command-backslash; this toggles the status of the line between comment and code. One of the advantages of having a whole line be a comment is that all lines in the bundle indented from it will also be comments, so a multi-line comment can be collapsed into one.
Debugging
As you develop a script, you are sure to make mistakes, or to have areas of doubt where you're not sure the program is doing what you expect it to.One technique for dealing with this situation is to insert at key locations calls to verbs that display information, such as "msg" or the various dialog verbs, to give you an indication of what part of the program is executing at any given moment.
But you can also watch the movement of the program in detailed slow-motion, and obtain information about the value of any variable at any given moment, by running the program in Debug mode.
To learn about Debug mode, let's use it with workspace.FileLister. Bring the workspace.FileLister window to the front and press the Debug button.
The window enters Debug state, with a new set of buttons across the top; and the first executable line (the call to the FileLister handler, namely the last line of the script) is selected, ready to execute. (Lines are selected before they have actually executed.) Now, if you hit the Go button, the whole script will execute.
Try it; the script executes to the end, and the window leaves Debug state. The Go button executes until the end of the script or until a line previously marked as a "breakpoint" is encountered. To mark a line as a breakpoint, command-click its triangle. You don't have to be in Debug mode to do this. Control- or command-click on the triangle of the "fileloop" line: the triangle turns into a hand indicating that this is a place to stop.
Press the Debug button and then the Go button; the script executes normally until it reaches the "fileloop" line, at which point it stops with that line selected.
We are now paused in the middle of executing our script. Any time you're stopped in a script in Debug mode, you can examine (and, if you wish, change) the value of local variables.
There are several ways to do this, but the simplest is to select the name of the variable and then hit the Lookup button. Try this with the variable "whatFolder": select its name, perhaps by double-clicking the occurrence of its name in the "local" line where it is declared, and hit the Lookup button. A window opens that looks something like this:
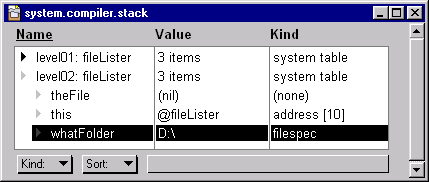
This window comes from inside Frontier's compiler stack. What it actually shows is all the variables being tracked at this level of execution, which is level 2. Why is it level 2? Because level 1, the top level of our script, is simply the call to the FileLister handler; once we start performing that call and are inside the FileLister handler, we are a level deeper than previously.
If you like, you can also look at the level 1 variables now; to do so, double-click the level 1 stack entry to open and examine it. At first you may not understand everything you see in these stack windows, but you can see that the stuff in the level 2 window makes sense: the variable "whatFolder" has received the name of whatever folder you selected when the dialog came up, and the other variables have no values because at this point in the script nothing has happened to give them one.
Now do this: adjust the windows so you can see both the stack window and workspace.FileLister. Bring workspace.FileLister to the front and hit the Go button. At first, it seems nothing has happened; but look at the level 2 window and you'll see it has changed: "theFile" now has a value.
When you pressed Go, the "fileloop" was executed once; thus, "theFile" was assigned its first file pathname, and this now appears in the compiler stack window. Press Go repeatedly to see "theFile" change until the routine ends; or, if you like, command-click the "fileloop" line to remove the breakpoint, and press Go to continue execution to the end of the routine. (Or, if you're sick of the whole thing, hit the Kill button to abort execution and leave Debug mode.)
So now we've seen that you can use the compiler stack windows not only to examine variable values but also to watch them change as the script proceeds. (By the way, it does no harm to leave breakpoints in your scripts; they have no effect when the script is run in the ordinary way. Breakpoints are meaningful only when you're in Debug mode.)
Stepping through a script
The other main thing Debug mode is most frequently used for is to step one command at a time through the script.This is a little tricky because the Step button alone may not do what you want. Try it: enter Debug mode, remove any breakpoints you've previously set, and hit the Step button. The script appears to execute normally, right to the end. That's because the Step button moves to the next command at the same level, and there is no next command at this level; once we've performed the call to the FileLister handler, we're done.
To step from the call to the FileLister handler to the first command within the FileLister handler, you have to use the In button. So try it: enter Debug mode, and hit the In button. Now you can repeatedly hit the Step button to watch the routine progress one command at a time. It gets a little boring when it starts going round and round the "fileloop", so you can hit Go if you've had enough.
You don't have to be right on a call to a handler or verb in order to use the In button. The rule is: the In button works like the Go button, except that as soon as we come to a command at a deeper level, we pause there; similarly, the Out button works like the Go button, except that we pause as soon as we come to a command at a shallower level.
Syntax errors
When you first attempt to run a script, Frontier will catch any linguistic ("syntax") errors in your scripts before starting to execute, and will put up a dialog telling you if it finds one.You can then press the Go To button to cause a spot near the error to be selected, though in a few cases it can still be hard to find.
Once your script is running, there can still be errors (called "run-time" errors); again, Frontier will stop and put up an error dialog, and at this point you can press the Go To button to see the line where the error occurred.
You can also hold down the Go To button to get a popup menu showing you the stack of embedded handler calls; this can be helpful in complex situations for understanding what the program was up to when the error happened.
So much for debugging.
Running scripts
Let's now review the chief ways in which UserTalk commands can be caused to execute. We're already familiar with two: open a script and press the Run button; and, call a script from another script. What others are there?Here are some of the main ones. You can select a script as an entry in the table it lives in and choose Main: Run Selection (control- or command-slash). This is the same as opening the script and hitting the Run button.
You can type (or paste) a command into the Quick Script window and hit the Run button. (The Quick Script window can be summoned with command-semicolon.)
In the Quick Script window, you have left the realm of outlines, so you can't enter a multi-line script in the same way as you do an outline. To see this, go into workspace.FileLister, select the "fileloop" line, and hit Copy.
Now go to Quick Script and Paste. Notice the transformation. The lineation and indentation here are just for ease of reading; what actually shows the structure of the lines is the use of curly braces and semicolons.
The rule is that every indented bundle must have curly braces around it, and every command that doesn't have a curly brace after it must have a semicolon after it. Bear this in mind if you write scripts of any length in the Quick Script window.
By the way, nothing stops you from using the same braces-and-semicolon notation here and there in an outline. For example, it would be perfectly legal, and in some ways it is rather clearer, to rewrite FileLister like this:
on fileLister ()
   local (whatFolder)
   if not file.getFolderDialog ("Pick a folder to list:", @whatFolder) { return }
   new (outlineType, @workspace.FileOutline)
   target.set (@workspace.FileOutline)
   editMenu.setFont ("MS Sans Serif"); editMenu.setFontSize (10)
   local (theFile)
   fileloop (theFile in whatFolder, 1)
      op.insert (theFile, down)
      rollbeachball ()
   edit (@workspace.FileOutline)
fileLister ()
Finally, you can attach a script to a menu item and choose the menu item. This technique is particularly valuable for utility scripts that you write. The menubar is just a special kind of outline, and you are free to modify it; indeed, there is a menu with your initials which you are actually expected to modify. Jump to user.menus.customMenu to find it.
When any menu item is selected, you can see its script by hitting the Script button. Where should you put scripts that you write? The workspace table is a great place: it's your space to do with what you want.
If I want to access a utility script from a menu item, I make that item's script a simple call to the utility script; that way, later editing of the utility script is easier because I don't have to open the menubar.
![]()
![]()